

You know the feeling. You light a candle expecting a calm, even glow, and instead the flame sinks into a narrow hole while a hard wall of untouched wax stays glued to the glass. That ugly collar is candle tunneling, and it usually means the candle never got hot enough, long enough, or evenly enough to melt across the full surface.
If you keep burning it the same way, the tunnel deepens, the scent gets weaker, and the wick can end up drowning in its own wax well. The fix is usually straightforward, but only if you match the repair to the cause. Use the wrong method, and you just waste wax.
Table of Contents
- What Candle Tunneling Actually Looks Like
- Why Candles Tunnel in the First Place
- Rescue Methods Ranked From Quick Fix to Deep Repair
- When Repairing Is the Wrong Move
- Sand Wax Candles and Tunneling
- Prevention Habits That Stop Tunneling Before It Starts
What Candle Tunneling Actually Looks Like
A tunneled candle has a simple signature, the flame burns straight down the center while the outer wax stays high and untouched. You end up with a crater in the middle and a thick wax collar around the edge. That collar is the part many try to save, but it's also the part that tells you the candle was never allowed to fully level itself.
The real damage is practical, not cosmetic
Tunneling wastes usable wax and weakens scent throw because the melt pool stays too small. It also makes the burn less stable over time, since the wick has to work harder in a deepening shaft of liquid wax. Left alone, the tunnel can become self-reinforcing, because later burns follow the same channel instead of resetting the top.
The baseline rule that fixes most of this is simple, burn for about 1 hour per inch of container diameter, so the melt pool reaches the edge instead of leaving that hard outer ring behind, a guidance commonly repeated in candle-care material including ardentseller.app's tunneling guide. For a 3-inch jar, that means roughly a 3-hour uninterrupted burn, and several guides also aim for a melt pool about 0.5 inch deep by the end of the burn. That's not fussy candle snobbery, that's how you stop the wax from learning the wrong shape.
Practical rule: if the melt pool hasn't reached the wall, the burn ended too early.
The clean way to think about how to fix candle tunneling is triage, not guesswork. First identify whether you're dealing with a shallow memory ring, a wick problem, or a candle that was badly matched to its vessel. Then choose the lightest fix that can reset the top.
Why Candles Tunnel in the First Place
A candle usually tunnels because the wax and the wick are out of sync, or because the burn environment keeps sabotaging the melt pool. Fixing it starts with identifying which failure is in play, since the repair that helps one candle can waste time on another. A candle that only needed a longer first burn should be treated very differently from one that was built with the wrong wick or the wrong vessel.
The first cause is the simplest one. The initial burn ends before the wax reaches the edges, so the candle learns a narrow path and keeps returning to it. Once that wax memory is set, later burns tend to follow the same channel unless you force the top to reset.
The second cause is mechanical. The wick is too small for the vessel, so it cannot build enough heat to push the melt pool outward. CandleScience's wick guidance, quoted in a broader repair discussion, treats this as a wick-size correction problem, and in practice that usually means stepping up one or even two wick sizes in the same series when the sides stay stubbornly solid.
The third cause is design-related. A wide jar with one wick, a drafty room, or a candle that asks more heat than its setup can give can all produce the same result. A wick can be trimmed correctly and still lose the fight if airflow keeps cooling one side or the vessel holds too much wax for that flame to manage.
That vessel question matters even more with a decorative jar like Candle glass Ombre pink-orange 280 ml /3.54×3.14in. The shape of the container can make the burn behave better or worse, and a single wick in a broad glass often needs tighter burn control than a narrower container. The flame has to generate enough heat to reach the outer perimeter, and some jars make that harder.
One quick self-check saves a lot of wasted effort. Ask whether the candle needed a longer first burn, a larger wick, or a better burn environment. If it is a memory ring, heat is the fix. If it is a wick mismatch, the hardware has to change. If the vessel design is the problem, no amount of foiling will keep it on track for long.
For a broader look at how wick count changes heat output in wider containers, see multiple wick candles.
Rescue Methods Ranked From Quick Fix to Deep Repair
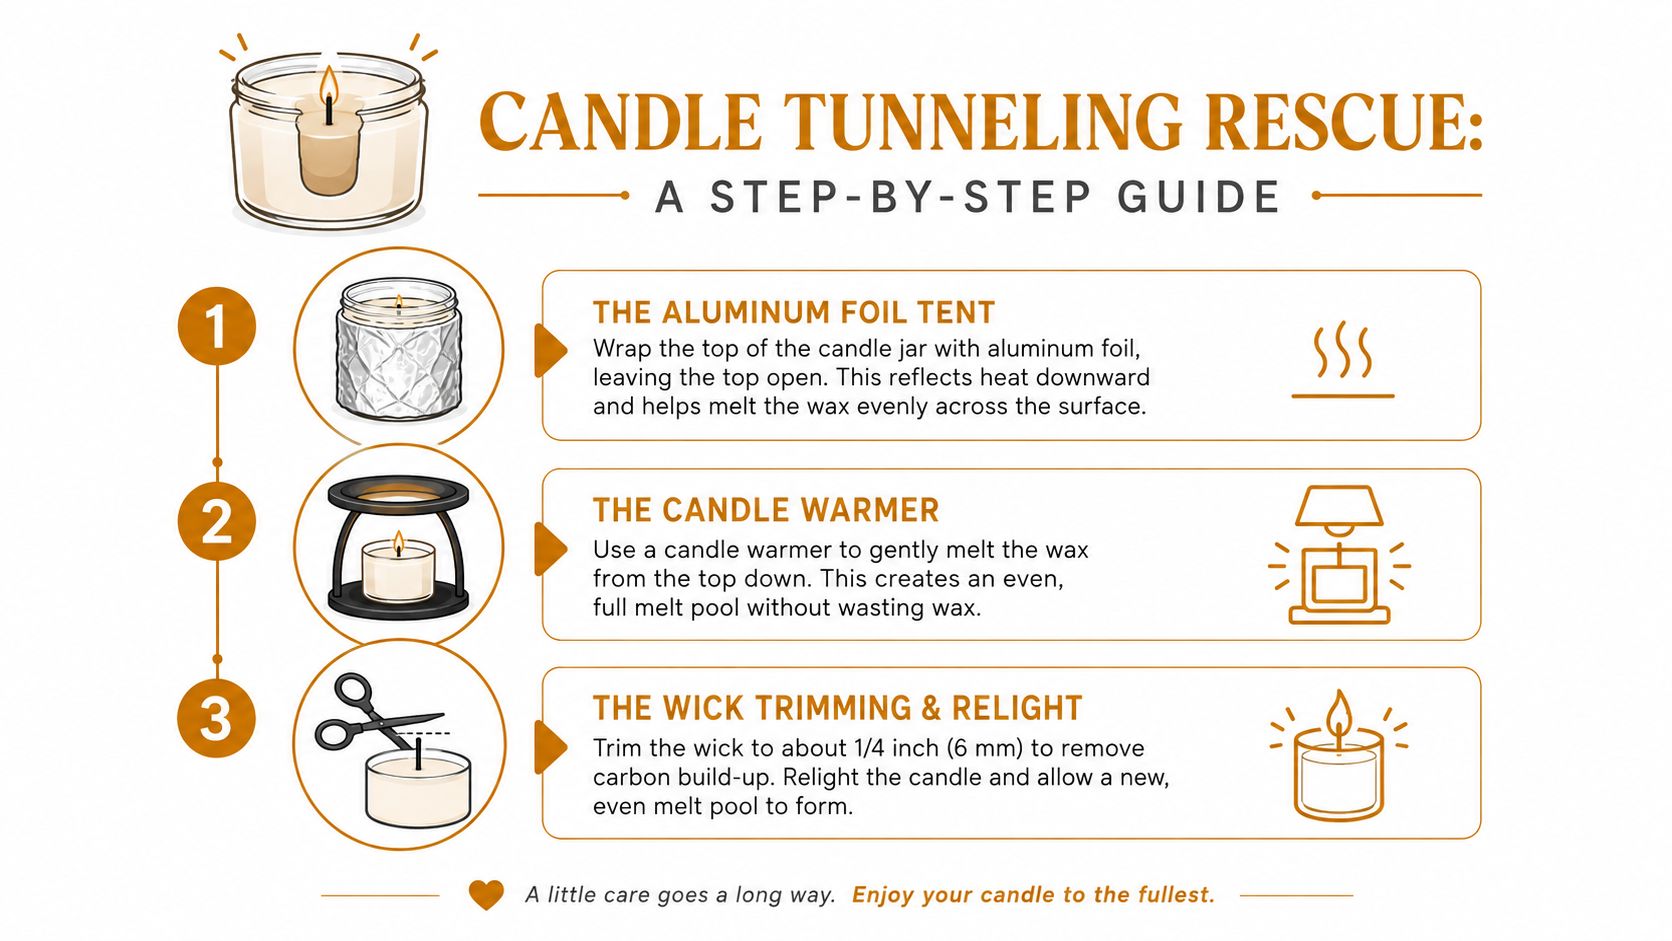
The fastest repair is the aluminum-foil tent, and it's the one I reach for first on moderate tunneling. Trim the wick to about 5 mm, or 1/4 inch, then shape foil into a loose dome over the jar with a small opening, about 1 inch, at the top so oxygen still reaches the flame. The foil reflects heat back to the cooler outer wax, and the candle usually needs about 1 to 2 hours to reset, though deeper tunnels can need 3 to 4 hours before the melt pool reaches the wall.
Foil tent, when it works and when to skip it
- Works well when the tunnel is shallow to moderate, the glass is intact, and you can supervise the burn.
- Skip it when the flame keeps starving, the opening in the foil is too small, or the candle is in a place where unattended heat is a bad idea.
- Best use case: a normal container candle with a stubborn outer ring that just needs heat reflected back inward.
Stop when the melt pool reaches the wall, not before, and never leave foil-covered candles unattended.
For more stubborn cases, move to direct surface reflow. A hair dryer or heat gun on a low or medium setting softens the top so you can let the wax level itself again. Some guides also use an oven around 175 to 200°F for 5 to 20 minutes as an alternative, but this is the place where people get sloppy and ruin a candle by overheating it, shifting the wick, or over-softening the jar wax.
Direct heat, when it earns its keep
- Works well when the tunnel is moderate to severe and the top needs a full reset.
- Skip it when the jar already shows heat stress, the fragrance has clearly turned flat from repeated reheating, or you don't want to deal with melted wax spatter.
- Best use case: a candle that needs the surface completely re-leveled before the next burn.
The hard reset is the scrap-and-refinish method. Pull out the hardened rim, re-level the top, then relight with the wick reset and trimmed again. This is the least elegant option, but it's the right move when the tunnel has already become a deep basin and passive heat won't catch up.
A useful benchmark from candle-care guidance is that tunnels deeper than 20 mm, about 0.8 inch, often need more than gentle reheating. That's the point where I stop pretending a foil tent will solve everything and start treating the candle like a repair job, not a rescue story.
When Repairing Is the Wrong Move
Some candles are worth repairing, and some are not. If the tunnel is deeper than about 20 mm, or 0.8 inch, the glass has already been heat-stressed, or the fragrance has gone dull from repeated reheating, the smart move is usually to stop forcing it. A candle can look salvageable and still be a bad candidate for another round of heat.
Severe recurring tunneling is also a diagnosis, not just a maintenance failure. It often points to a wick-size mismatch or a vessel that doesn't suit the wax load, which means the fix is to change one variable, not to keep repeating the same burn pattern and hoping for a different result. That's why experienced troubleshooting advice keeps circling back to wick performance and burn geometry instead of selling one magic repair.
The Candledust approach to multiple-wick candles is a good reminder that some containers need a different setup, not more stubbornness. If a vessel is structurally fine but the wax has become the issue, refillable systems make more sense than trying to rescue a candle that's already telling you it's mismatched.
Use this decision rule
- How deep is the tunnel? If it's shallow, repair makes sense. If it's deep, stop and reassess.
- How much wax is left? If the usable wax is still substantial, a repair may be worth it. If not, you're just chasing a bad burn.
- Is this candle right for its vessel? If the jar and wick were poorly matched from the start, replace the setup instead of repeating the same problem.
One more thing, cracked glass ends the conversation. Once a vessel has already taken too much heat, I don't recommend another burn in it. Safety beats sentiment every time.
Sand Wax Candles and Tunneling
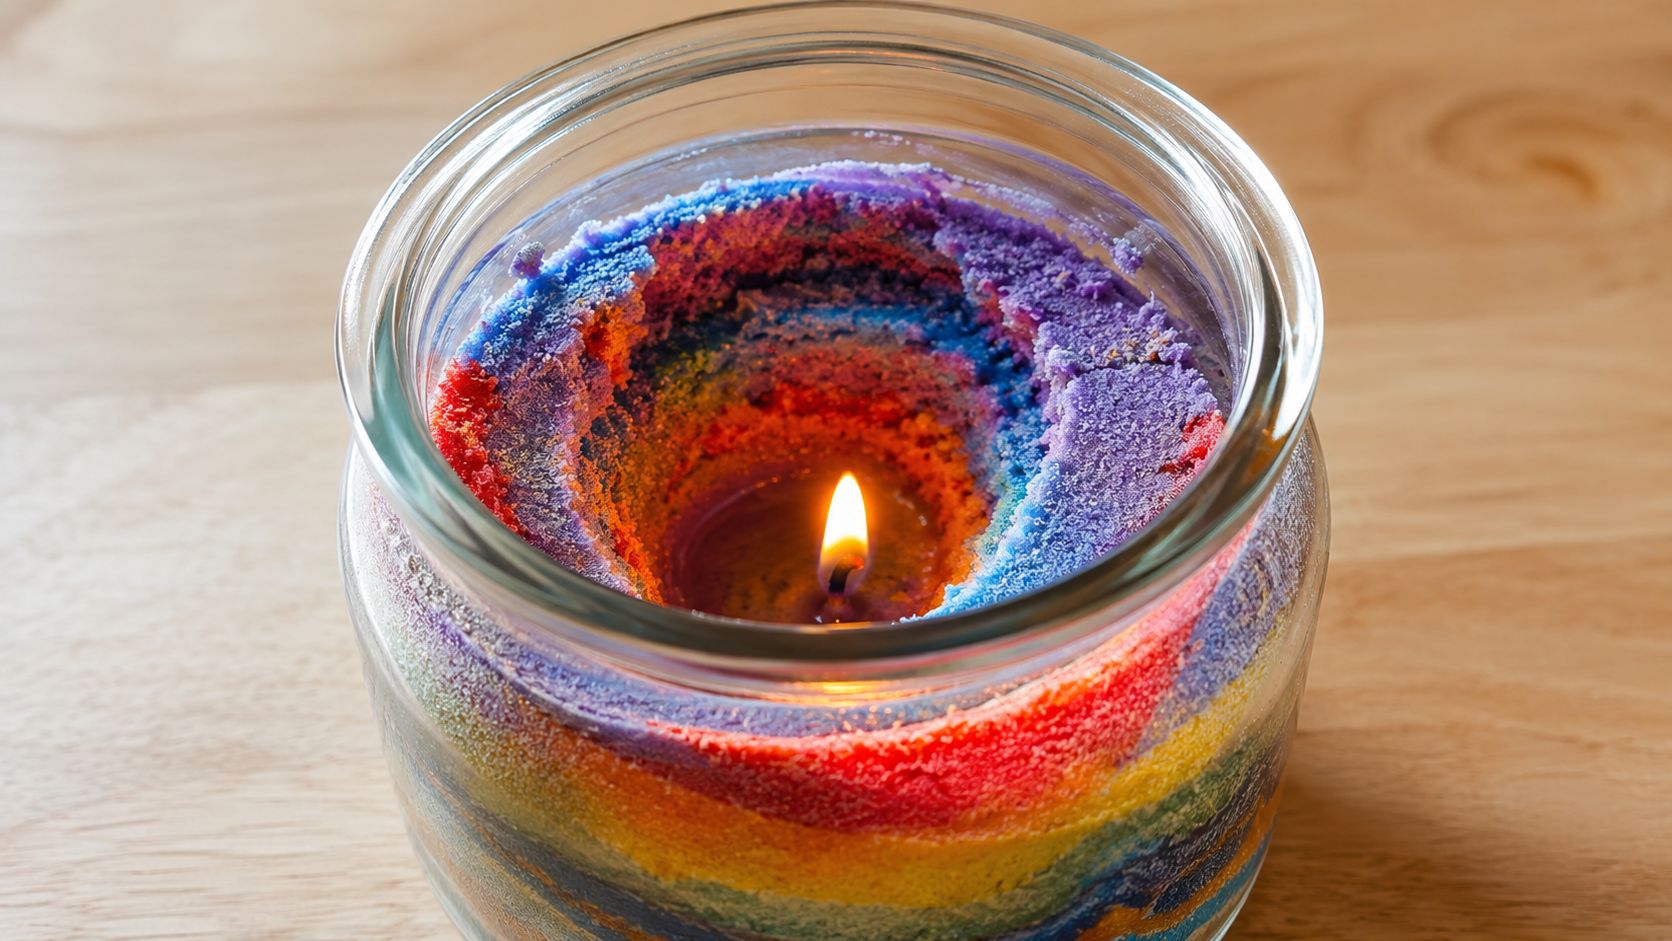
The Candledust guide to candle sand vs pearled candles matters here because sand wax doesn't fail the same way solid container wax does. In a sand candle, the top layer melts into a thin liquid pool above dry granules, so a tunnel usually looks like the wick sinking into a deepening well while the outer ring stays powder-dry. That means you're not dealing with a poured wax memory in the same way, you're dealing with a surface that needs to be reset and re-centered.
How to rescue sand wax without treating it like a jar candle
For sand wax, I don't reach for foil first. I scrape back the hardened rim, smooth the surface, and reset the wick in fresh center powder so it stands upright again. Then I let the next burn establish a broader pool, because the material behaves like granulated refill wax, not a solid block that needs to be melted through a rigid shell.
That's why wick placement matters so much with refillable sand candles. The wick needs to be centred, upright, and embedded far enough into the sand that it doesn't tilt as the surface melts. If the wick leans early, the burn path narrows and the well deepens before the rest of the surface can catch up.
The first-burn logic still applies, but it applies differently. A 1-hour-per-inch habit is still the right mental model, only now you're watching for an even melt across the visible surface of the sand rather than waiting for a jar wall to liquefy. In Candledust formats, that means adjusting your expectations to the refill size, whether you're working with 350g, 650g, or 1000g.
The #Perfect pearl texture is useful here because the sand is uniform and smooth, so the melt front spreads more predictably than in a clumpy or uneven blend. When the surface is silky and even, it's easier to see whether the burn is drifting off center or staying on track. That's the kind of visual feedback solid candles rarely give you.
For a practical refill setup, Extra wicks 6cm (1000pcs) is an extra wick pack, and the product snapshot states that wicks are included with all products but additional wicks can be purchased if needed. That matters for sand wax because a clean reset often means swapping in a fresh wick rather than trying to nurse a tired one through another burn.
Prevention Habits That Stop Tunneling Before It Starts
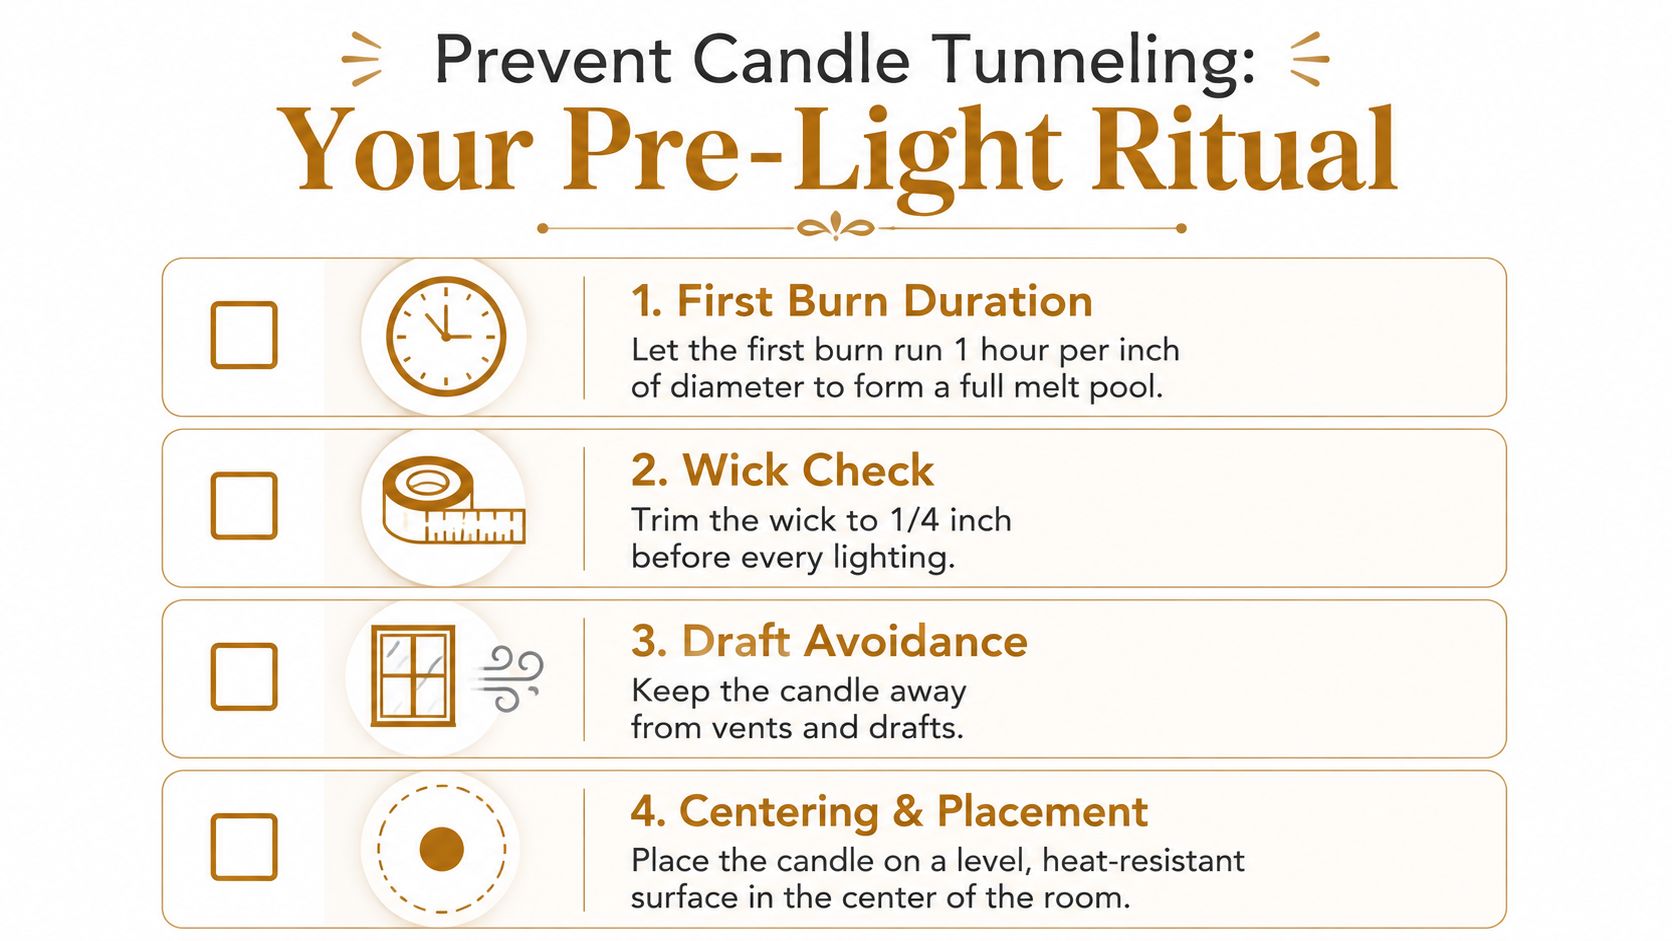
The easiest tunnel to fix is the one you never let form. Start with the first burn and let it run long enough for the melt pool to reach the wall, using the 1 hour per inch of diameter rule as your baseline. After that, every relight starts with a wick trimmed to about 5 mm, or 1/4 inch, because a long, curled wick throws heat unevenly and pushes the flame off center.
The habits worth keeping
- First Burn Duration: Let the candle burn long enough to create a full melt pool.
- Wick Check: Trim before every lighting, not after the flame is already struggling.
- Draft Avoidance: Keep the candle away from vents, fans, and open windows.
- Centering and Placement: Put it on a level, heat-resistant surface where the flame can burn evenly.
These habits work because they control heat, airflow, and flame position. They are the right fix for standard jar candles and refillable wax setups alike when the goal is an even melt from the start. Skip them only if the candle is already so badly misshapen that the wick can no longer keep pace, because at that point a repair pass makes more sense than another cautious burn.
There is also a hard stop many people ignore. Don't burn a candle for more than 4 hours at a stretch, because overheating can distort the wax and make the top behave badly on the next burn. If you like to burn candles for long evenings, extinguish it cleanly, let the top settle, and relight it later instead of running the flame until the vessel is overheated.
Container choice matters too. Extra-wide jars with a single wick are more likely to tunnel if the wick can't keep up, and shallow tins can show the same problem when the wick and vessel are mismatched. If a candle's shape keeps fighting the flame, that is a design clue, and it is worth correcting before you blame your burn routine. For more practical advice on extending burn time, see our guide on how to make candles last longer.
Sand wax behaves differently. Refills made from loose sand-style wax need a centred, upright wick and a clean surface so the flame can spread evenly through the granules. If the wick leans or sinks unevenly, the burn path tightens fast, so the prevention move is better wick placement, not the same rescue method you would use on a rigid solid candle.
If you remember only two things, make them these, burn long enough on the first light, and trim the wick before every relight. That routine keeps the wax wall from forming, and it saves you from wasting time on fixes you should never have needed.